Showing posts with label recipe. Show all posts

Tuesday, January 4, 2011

Danish New Year's Traditions

Now I told you about Christmas traditions here in Denmark, I might as well tell you about New Year's as well. Not that there are so many traditions related to this celebration of entering the new year but there are a few which you can be sure to meet if you celebrate New Year's in Denmark.

One of these traditions is to serve fish of some kind either as a starter or a main course. Some save the seafood (prawns and oysters) for later and serve it with the champagne at midnight. An old tradition in Denmark is to serve boiled cod fish with mustard sauce. Not one of my favourite dishes as I find it very bland and really don't care for boiled fish at all. I bet it's much better steamed... At home with my parents we have either prawn cocktails as a starter or we have toast with prawns, caviar and mayo as a midnight snack along with cheese and crackers. Sometimes my mother chooses to swap out the prawns for gravad lax on toast. That's a treat as well.

Then for the main course, if you have chosen to have fish as a starter, we often get some kind of special and or expensive cut of meat. That could be beef tenderloin, roast beef, veal sirloin roast or something like that with all sorts of side dishes. On New Year's Eve this year (well last year actually) my husbands uncle had made pork tenderloin in mushroom gravy served on toast and it was magnificent! It really tasted so good that you couldn't stop eating...

Now for dessert which varies from everything between having ice cream, lemon mousse, Irish Coffee, Crème Brûlée or some other fancy kind of dessert. This year I chose to make white chocolate mousse with blackberry sauce and Daim sprinkles on top... My husband actually decided that he wanted this dessert because it's his favourite flavour combo when it comes to desserts.

  
Another tradition on New Year's Eve is to toast the New Year with some kind of bubbly drink, whether it being champagne, Verdi, Asti Sprutmante or which ever you prefer. My favourite is Asti and I only had a tiny sip this year because I'm pregnant and don't drink alcohol at all. With this drink we also have Danish marzipan ring cake like this:

picture borrowed from http://www.scandikitchen.co.uk/

I tried to make this last year but found it very time consuming and a bit difficult to get the perfect "tower" so this year I made Danish marzipan cake bits instead and I loved them. I'm a sucker for marzipan so this is my favourite treat.


I think you should try this out yourselves and then tell me if you're as big a fan as I am of these delicious goodies...

Danish Marzipan cake bits 
Marzipan mix:
500 grams raw marzipan (containing a high level of almonds) 
200 grams cane sugar
100 grams egg whites

Icing:
100 grams icing sugar
a bit of egg white


Making the marzipan mix
Whisk cane sugar and egg whites until it's a white and fluffy substance. Leave it to infuse for an hour until the sugar is dissolved. Knead the egg and sugar mix into the marzipan little by little until the mix is homogeneous.

Put the marzipan mix into a piping bag with a large nozzle (you decide which ever you like best I used a bekanal nozzle) and pipe out the pieces onto a baking sheet as big as you like them to be. Let them set for about half an hour before putting them into the oven and baking them at 200C (400F) for about 8-10 minutes until they are golden. Let the bits cool off.

Icing:
Sift the icing sugar into a bowl and add a bit of egg white. Whisk it together and if the icing is left making little tops when you take out the whisker it is ready. If it is still rather liquid sift in some more icing sugar and mix again. Make a little piping bag out of a baking sheet (see how to HERE) and fill it with the icing, not all the way to the top as it will come out on top as well. cut a hole at the end of the cone and pipe out thin lines on the marzipan cake bits.

Have fun making these delicious treats which are also very good even though your not celebrating New Year's.


Thursday, December 2, 2010

Swedish chocolate cookies and Crispy cookie circles

These cookies are some of the traditional Christmas cookies my family have been making for as long as I can remember for the holidays and I really want to share these with you. I have some fond memories of helping out in the kitchen at Christmas along side my mum and grandmother and I really miss that as I've gotten older. I try to bring along some of their traditions and for me it just wouldn't be Christmas without.
Christmas is for me the time for remembering those who are near to us and loved ones who have passed away and these cookies help me to do that this time of year. So here we go...


Swedish chocolate cookies (cookies on the left)
300 grams all purpose flour
1 teaspoon baking powder
200 grams sugar
1 teaspoon vanilla sugar
2 tablespoons cocoa
200 grams cold butter
1 egg

Brushing:
1 egg white
 
Garnish
Danish pearl sugar
Mix together all of the dry ingredients in a bowl. Cut the butter into small pieces and crumble it into the flour. Use the egg to make the dough stick together - it will be quit soft. Roll the dough into 6 bars with about 1½ centimetre girth and as long as your baking sheet allows them to be.

Put the bars onto the baking sheet and lightly press them flat with your palms. Brush them with egg white and sprinkle pearl sugar on top. Bake the bars in the oven at 175C (347F) for about 10 minutes.
 
When the bars are done cut them into diagonal cookies while they are still hot (can be done with a pizza wheel) and leave them on the baking sheet to cool of before putting them into a container.

Crispy cookie circles (cookies on the right)
250 grams cold butter
250 grams all purpose flour
50 ml double cream

Brushing:
1 egg

Garnish:
Danish pearl sugar

Cut the butter into small pieces an crumble it into the flour. Add in the cream to make the dough stick together but you mustn't knead it. Put the dough in the fridge for about ½ hour. 
Roll out the dough onto a heavily flour dusted tabletop and cut out the cookies with either two glasses or round cookie cutters making the circles about 1 cm wide.

Place the cookies onto a baking sheet and brush the cookies very carefully with the egg (whisked together) and sprinkle with pearl sugar. Bake the cookies in the upper half of the oven at 200C (400F) for about 8 minutes or till they are golden.
 
Be cautious when removing the cookies from the baking sheet they will crumble or break apart very easily. Put them carefully into a container when they are completely cooled off. 

Bon appetit and enjoy!

Sunday, November 28, 2010

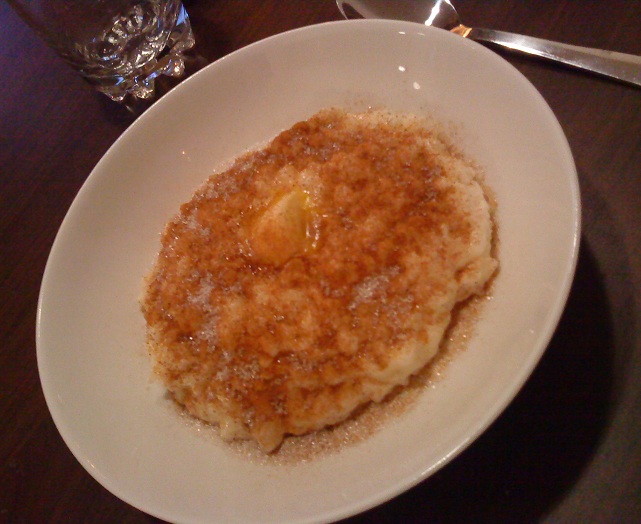
Danish Rice Pudding

As promised my recipe for warm rice pudding coming right up - this is a very time consuming dish and when I was little my Mum used to bring the pudding to a boil, let it cook for about 10-15 minutes and then cover the pot in newspapers and towels and leave the pot in the foot of the bed underneath the covers for about 2 hours to cook through. She could then spend time doing other things as well besides slaving away at the stove.

This recipe comes with the particular brand of pudding rice I buy and I never go wrong with this one. The last time I made it, I had bought another brand of rice and it didn't turn out good at all - and this time (with the right rice) it was really good! It needed a bit more salt, but that's my fault for not seasoning it right... This is my brand of rice:


Give a warm Christmas welcome to:

Danish Rice Pudding (serves 6 people)
2 litres whole milk
250 grams pudding rice
a pinch of salt

Pour the milk into a thick bottomed pot and bring it to a boil. And add in the rice. Give it a good stir and let it boil for about an hour at low heat. Remember to stir frequently to keep the pudding from burning in the bottom of the pot.
When the pudding has thickened add in the salt and have a taste - if tastes bland add in a bit more salt.

Serve the rice pudding with a sprinkle of cinnamon sugar and a nub of butter on top.
Bon appetit...


Tuesday, July 6, 2010

Tortilla on toast with garlic mayo and rocket

And so I've gotten far behind on posting the recipes once again... sorry... I'll try to make it up to you at one point or another but for now this is the 13th dish in our food project and a pretty good one at that. So if you have some leftover tortilla from the Spanish Tortilla dish, this is a great way to create a new dish.
Carina tried out the real recipe with the grilled toast, I just tried it with Danish rye bread instead and brought it in my lunch box on monday. It tasted really good! Because I was in a hurry during my lunch break I totally forgot to take pictures so you'll have to do with Carina's picture and to read her experiences with this dish go to her blog - HERE

For four people you'll need:

4 pieces of toast
1 dl mayonnaise (or drained yoghurt) I used miracle whip light
½ clove garlic (I used garlic powder instead)
4 pieces of tortilla leftover
50 grams rocket (I forgot the salad but it tasted fine without it)
1 tablespoon extra virgin olive oil 
Salt
Freshly ground pepper

Grill the bread in the oven or toast it on the toaster. Stir the mayo together with garlic and season with salt. Spread out the garlic mayo on the bread and put a piece of cold or hot tortilla on top of it. Arrange with rocket dressed in olive oil, salt and pepper.

Bon appetit...

Sunday, July 4, 2010

Spanish Tortilla with sweet potatoes and tiger prawns

I chose to make this our 12th dish today because I put the tiger prawns in the tortilla and because we decided to try out a follow up recipe with the leftovers for lunch. I then had to make this where I had two consecutive days avaliable to make such food so the prawns wouldn't go bad...

This dish was perfect for this evening - it has been a HOT day in Aalborg and we really weren't that hungry so this easy dish was just what we needed. It took me no time to make and it tasted really good! My husband liked it as well but we agreed on it needing a bit more seasoning as it was a bit bland. You could also easily substitute the prawns with chicken or Italian ham. That would also go very well with the sweetness of the potatoes. I just LOVE sweet potatoes... if they weren't so expensive I would buy them more often. They go really well with grilled food and are quit quick to get tender compared with other types of potatoes.

So if you need a quick and easy dinner for tomorrow evening or for lunch, this is what you could whip up and serve for your family or friends. They'll love it too...

For four people you'll need:

2 kg onion

600 grams sweet potatoes

3 tablespoons extra virgin olive oil

6 organic eggs

Salt

Freshly ground pepper

16 tiger prawns without shell


Accompaniment: 300 grams cherry tomatoes, 4 spring onions, 1 dl. teriyaki dressing*


Peel the potatoes and onions and cut them into coarse cubes of 2 by 2 cm. Fry the onion and potato cubes in a skillet with olive oil for about 7-8 minutes without it taking too much colour.


Whisk the eggs and season with salt and pepper. Add the prawns to the eggs and pour the mixture into the skillet with the potatoes and onion.


Stir a bit with a spatula until the eggs start to stiffen. Let the tortilla cook slowly on the stove until it's done or let it cook the last 10 minutes in the oven at 200 C (about 400F)


Cut the cherry tomatoes in halves and finely slice the spring onions. Mix it with the teriyaki dressing. Serve the tortilla in the skillet sprinkled with roughly chopped parsley and the tomato salad. I made the salad a bit different - I didn't make the dressing, so i just quartered the tomatoes, finely chopped the spring onions and mixed it together in a bowl. When the tortilla was dine I sprinkled the salad on top and decorated with parsley before serving.

Bon appetit...


*Teriyaki dressing:

5 dl soy sauce

3 dl mirin (http://en.wikipedia.org/wiki/Mirin)

2 dl Sake

3 tablespoons sugar

2 organic limes


Stir the soy sauce, mirin, sake and sugar together in a bowl. Grate the lime zest and squeeze out the juice. Stir both the zest and juice in with the rest of the ingredients and you have a teriyaki dressing.

Tuesday, June 29, 2010

Potato dish with crispy crumble and mushrooms

Well I'm doing things a bit backwards at the moment as this actually is the 11th dish we have done in our little project. I still have to make the 10th dish because my husband insisted on having pizza for dinner the evening we had planned to make a project dish - so I caved and let him have his way and I brought leftover pizza in my lunch box the following day. This means I have to do four project dishes this week instead of three and this is the first of the week.

The translation credit goes to Carina, she was yet again the faster one to get the recipe translated and you can see her experiences with this dish on her blog - HERE

Both my husband and I liked this dish but thought it was a bit too dry with no sauce or liquid cream between the layers of potatoes. However it tasted quite good and I'm sure it would taste even better witch bits of bacon or ham chucked in with the potatoes. It's also a good dish for evenings without meat - just put in a bit more cream and you'll be flying!

For four people you'll need:

Filling:
2 onion
700 grams potatoes
2½dl double cream (9%)
3 tablespoons finely chopped parsley
salt and pepper

Crumble:
2½ dl wholemeal flour
50 grams butter
1 tablespoon rosemary or thyme, if you have it in the garden -(I used lemon thyme and it went very well with the other ingredients)
1 teaspoon of salt
 300 grams mixed mushrooms (I used brown mushrooms as they have the most flavour and the mixed mushrooms were a bit more expensive)
1 tablespoon of oil
salt and pepper

Fresh rosemary

Cut the onions into rings and the potatoes in thinly slices (2mm) (If you don't like onion rings you can just finely chop the onion and mix it with the potatoes. That's what I did and it came out good). Spread out onion and potatoes in an oven-proof dish. Whisk cream, parsley, salt and pepper together and pour it over the onions and potatoes. Turn on the oven and set it to 200C, put in the dish in the cold oven.

Crumble the flour, butter (cut in small pieces), rosemary and salt together at the tip of your fingertips. Take out the oven-proof dish after 30 minutes, sprinkle the “crumble-dough” over and put back in the oven. Leave it to bake for another 15 minutes or till the surface is crispy.

Roast the mushrooms in oil on a frying pan and season it with salt and pepper. Put the (finely chopped or sliced) mushrooms over the dish at the end possibly with some not too roughly chopped rosemary leaves right before serving.

Bon appetit...


Sunday, June 20, 2010

Sunday baking

What a lovely way to spend a Sunday just baking, tidying up and doing a load of laundry or two... I spent the most time baking of couse and this is the result (I even learned to edit my photos as well and this is my first time trying to blur the background...)

Rhubarb cake and peppermint muffins with peppermint butter cream

Earlier this week my husband brought the leftover sweet rolls with honey and nuts to share at work and they really liked them so his colleagues came asking for more. Thursday evening I asked my husband to look through my muffin cook book and tell me what he wanted to bring and he pointed directly to the peppermint muffins. He is absolutely crazy about peppermint so that didn't surprise me. The hard part of making these muffins were getting hold of the peppermint extract which is required. I couldn't find it in the city so I just replaced it with After Eight chocolate and it worked like a charm! These muffins are really delicious if you like peppermint flavour so try them out.

Peppermint muffins with peppermint butter cream (makes 12 muffins)
Ingredients:
125 grams soft butter
125 grams sugar
2 eggs
125 grams all purpose flour
1 teaspoon baking powder
Peppermint extract (a few drops)
Green food colouring (a few drops)
100 grams chocolate chips

Peppermint butter cream:
175 grams soft butter
350 grams confectioner's sugar
3 tablespoons boiling water
Vanilla extract (a few drops or seeds from a whole vanilla pod )
Peppermint extract (a few drops)
Green food colouring (a few drops)

Decoration: chocolate sprinkles

Baking:
Preheat the oven to 190 C (375F). Get a bowl and whisk the butter and sugar in the bowl until it has a light and fluffy texture. Add the eggs, flour, baking powder, peppermint extract and the green food colouring and whisk until the mixture is smooth. Then stir in the chocolate chips and distribute the mixture into 12 muffin cases. Bake the muffins in the oven about 12-15 minutes until they have risen and are firm in the middle. Remove the cakes from the oven and let them off on a grid and get started on the butter cream.

Peppermint butter cream.
Whisk the butter in a bowl until it softens and then add the confectioner's sugar, the boiling water and vanilla. Whisk the mixture until it gets a light colouring and becomes smooth.The add peppermint extract and the green food colouring and whisk it all together. When the muffins have cooled off apply the butter cream on top and sprinkle with chocolate sprinkles...


I also succeeded in making a old-fashioned Danish rhubarb cake today with help from a delicious recipe I found on one of the blogs I read. We haven't sunk our teeth into this cake yet - I'm serving it for dessert tonight but it has been trying for us not to take a big bite out of it already... I'll share this recipe with you in English and link to the original recipe in Danish at the end of this post.

Old-fashioned rhubarb cake with meringue
Ingredients:
175 grams butter
100 grams sugar
2 tablespoons vanilla
1 pinch of salt
3 egg yolks
250 grams all purpose flour
2½ teaspoons baking powder
6 tablespoons milk

Rhubarb meringue:
3 egg whites
200 grams sugar
100 grams chopped hazelnuts
600 grams rhubarb

Dough:
Melt the butter and mix it with sugar, vanilla and salt. Add the egg yolks. Mix flour and baking powder and alternating sift it into the bowl with the milk.

Rhubarb meringue:
Wash the rhubarb and cut it into little pieces of 2 cm each. Put them on a kitchen towel to dry off. Whisk the egg whites stiff and gradually mix in the sugar which makes the meringue tough. Carefully fold in the chopped nuts and the rhubarb. 

Pour the dough into a tin and spread out the rhubarb meringue on top of it. Bake the cake at 175C (325-350F) for about an hour. Keep an eye on the cake and make sure that the meringue doesn't get burned. Cover the cake with tinfoil when it has darkened enough for your taste.

Bon appetit...

To see the original recipe go to Slagt En Hellig Ko - Gammeldags rabarberkage

Sunday, June 13, 2010

Sweet rolls filled with honey and nuts

Perfect recipe for a lazy sunday afternoon when your just snoozing about anyway and get the munchies - it takes time to make and that's why it's perfect for a day like this...

I made icing to go along with it - it wasn't that sugary because it contains honey instead of sugar and so the icing really compliments the nutty and delicious flavour. The rolls can be made the day before and reheated before serving. This batch makes up 16 rolls and they are a nice supplement to your morning cup of coffee, afternoon tea or the sunday brunch. You'll need:

Dough:
25 grams fresh yeast
2 dl milk
2 eggs
1 pinch of salt
½ tablespoon ground coriander
1½ tablespoon honey
8½ dl flour
125 grams butter


Filling:
100g hazelnuts
2 large tablespoons honey
50 grams butter

Icing: confectioner's sugar and water

Warm up the milk and dissolve the yeast into the milk. Whisk in the eggs and add salt, coriander and honey. Take out another bowl and put in the flour. Cut the butter into smaller pieces and crumble it together with the flour. Gradually add the flour mixture to the milk and knead the dough quickly and let it rest under a cloth for 1 hour. Cut the dough into two pieces. Roll them out into two circles about ½-1 centimetres thick and cut the circles into 8 triangles each.

Put the nuts into a blender and blend them until they have a floury texture. Add honey and butter and give it another spin making it a sweet paste.
 
Spread out the filling on the dough triangles and roll them up into horns and give the ends a little squeeze so they will stick around the filling.

Let the horns rest on a baking sheet for about 20 minutes and bake them in a preheated oven at 200C (about 400F) for about 15 minutes. Decorate with icing and hazelnut sprinkles before serving.

Bon appetit...


Read about Carina's result and take on this "dish" - HERE

Thursday, June 10, 2010

Pork chops with garlic and herbs

This is the the fifth dish in the food project and I think it just keeps getting better. I really enjoyed this dish and so did my husband even though he wasn't that hungry. I thought he didn't like it because he had left a whole pile of food on his plate but he said he really liked it and wanted me to cook it again some time... That's how I measure success - when my husband tells me to cook a new dish again it for sure a home run! I didn't make the citrus-ginger dressing - I forgot to buy ginger, so I served it with melon cubes instead.
I really loved the fresh herbs in the mash and fennel just gives everything a delicious liquorice-like flavour - it blended well together and my taste buds were dancing!

For four people you'll need:

1 tablespoon fennel seeds
zest and juice of 1 lemon
4 large pork chops
4-6 cloves garlic
salt and freshly ground pepper
1 tablespoon grape seed oil or olive oil

Mash:
800 grams potatoes for mash
2 dl milk
50 grams butter
2 dl finely chopped fresh chives, dill and parsley

Accompaniment:
Green salad and citrus-ginger dressing*

Stir together fennel seeds, lemon juice, zest, salt and pepper. Rub it all over the pork chops, cover it up and let it marinade for about 10 minutes.
Peel the potatoes and cut them into smaller pieces. Boil them in salted water for about 15.-20 minutes until they are cooked all the way through and falling apart.
Pour the water from the potatoes and put the pot back on the stove to let the remaining water on the potatoes evaporate. Add the butter and milk in the pot and mash it all together with a whisk leaving it to be a lumpy mash. Season with salt and pepper and mix in the chooped herbs right before serving the dish or else the herbs will loose their fabulous green colour.
Fry the pork chops in a hot skillet with oil for about 3-5 minutes on each side along with the garlic slices. Be careful not to fry the garlic for too long as they will become bitter if they are browned too much.

Serve the pork chops with the mash filled with herbs and along side that a green salad with citrus-ginger dressing.

*Citrus-ginger dressing
60 grams fresh ginger
zest and juice of 1 lemon
4 dl extra virgin olive oil

Peel the ginger and slice it into smaller pieces. Put it in a blender together with the lemon juice and zest and add olive oil. Mix it all together and keep the dressing in a bottle or plastic container with a lid on in the fridge. It will keep fresh for about 2 weeks.  

Bon appetit...

  
Read about Carina's experience with this recipe - HERE

Sunday, June 6, 2010

Fettuccine with Jerusalem artichoke cream

This is just one of the other dishes I made during this week and it was so good I had to share it here. I had never tried Jerusalem artichokes before and was pleasantly surprised and my husband too. Hope you'll like it as well, and here we go - for four people you'll need:

100 grams bacon cubes
50 grams parmesan cheese
300 grams fettuccine
1 handful parsley

Jerusalem artichoke cream:
700 grams Jerusalem artichokes
1 dl broth (I used chicken broth)
200 gram Philadelphia light 12%
salt and pepper

Turn on the oven at 200 C (400F). Scrub the artichokes free of dirt and dry them off. Do not peal them. Put the Jerusalem artichokes on to a baking sheet and bake them in the oven for about 30-40 minutes until they are tender. Fry the bacon until it is crisp and put it on a kitchen towel to dry off.

Put the artichokes in the blender together with Philadelphia and the broth and give it a spin until it has a creamy consistency. Season with salt and pepper.

Cook the fettuccine as directed on the packaging and drain the water from the pasta. Grate the parmesan cheese and chop the parsley. Mix the fetticine and the Jerusalem artichoke cream and sprinkle it with bacon and parsley.

Bon appetit...


Passion fruit soda

This week we decided on doing an extra recipe just to try out one of the smaller recipes and the choice was to mix a drink - non alcoholic that is... well you can make the adult version and add some rum if you'd like but for now this is the kiddy friendly version. 

I had planned to serve it as a welcome drink to my birthday dinner party yesterday but I forgot to shop for it so we moved it to be a part of the brunch we made today. It blended perfectly with the brunch, it has a fresh slightly sour taste to it but that gets you going in the morning and I'm glad that we served it with brunch instead. My husband and father in law were not very fond of the taste of it and couldn't get past the seeds of the passion fruit that kept getting stuck in the straw. I forgot the mint sprigs to put in but it tasted fine without it. 

For 1 glass of passion fruit soda you'll need:

2 passion fruit
1 teaspoon cane sugar
3 dl sparkling water
ice cubes
4 mint sprigs

Split the passionfruit and empty the contents with a fork or a teaspoon into a large glass.Stir in the cane sugar, you can add more if the taste is too sour for you.Add the mint leaves and fill up the glass with sparkling water and ice cubes.
Bon appetit...


Read about my friends experience with this drik on her blog - Carina's Blog

Friday, June 4, 2010

Pasta with crisp bacon, glazed sunflower seeds, asparagues and thyme breadcrumb sprinkle

That's one long title for a dish - well it just describes the contents really and it's a simple recipe and tastes good as well in my opinion. My husband liked it as well but then again he loves everything that has the word bacon written all over it...

The recipe says to use basil but we are not that fond of basil so I just left it out, but if you like it, you should try it as well. I spoke to Carina after they had eaten and they were not too thrilled about this dish, but then again, she has some difficulties acquiring some of the ingredients for the recipes and that makes it a whole different experience for her.

However I would love to share this lovely recipe with you and for four people you'll need:

100 grams sliced bacon

Toasted glaced sunflower seeds
4 tablespoons sunflower seeds
1 tablespoon sugar
2 tablespoons lemon juice

1 bundle of fresh asparagus
Dressing
4 tablespoons cold pressed rapeseed oil
1 clove grated garlic
1 tablespoon lemon juice
salt and pepper

Thyme breadcrumb sprinkle
½ dl breadcrumbs
2 tablespoons finely chopped thyme
salt flakes

500 grams fresh spinach pasta
1 pot of fresh basil
Fry the bacon in a skillet until it is crisp and golden. Leave the slices on a piece of kitchen towel to get rid of the excess fat.

Toast the sunflower seeds on a dry skillet over medium heat. Whisk together sugar and lemon juice and pour it into the pan with the sunflower seeds. Let the liquid reduce and pour the glazed sunflower seeds onto a baking sheet and spread the out before they cool down otherwise they will stick together.

Break of the lower part of the asparaguses and blanch them for one minute in boiling water. Rinse the asparaguses under cold water to stop the boiling and save the boiling water for cooking the pasta. Cut the asparaguses into smaller pieces.

Whisk together the ingredients for the dressing.

Toast the breadcrumbs in a skillet until i gets golden. Take off the breadcrumbs and mix it with thyme and salt. Cook the pasta as advised on the packaging until it is cooked 'al dente'.

Drizzle the dressing over the pasta and then add the bacon, sunflower seeds, asparagus and basil leaves. Serve the thyme-breadcrumb sprinkle on the side and sprinkle it on top of the dish right before eating.

Bon appetit....


Read about my friends experience with this dish on her blog - Carina's blog

Tuesday, June 1, 2010

BBQ Chicken with salt baked sweet potatoes and grilled corncobs

Week two of the food project has begun and we kicked it into gear with a classic BBQ recipe. This kind of recipe makes me sorry that we live in a flat with no balcony or back yard to sit in and enjoy an evening of grilled delights. We'll have to do with a grill pan and imagine the smell of smokey charcoal. 

This dish was really good and what more is my husband LOVED it - he was very thrilled about it and he can't wait to have leftovers another day. It was a bit different from the grill recipes I've tried before, where the chicken had to me marinaded in the BBQ sauce for a while and then cooked on the grill because this had the BBQ sauce on the side. It was good and I think this is a recipe I will return to and make a few changes here and there just to tweak it and make it more me.

Now for the sharing part - for four people you'll need:

600g of sweet potatoes
1 kilo of coarse sea salt
4 corn cobs
4 chicken breasts
1 tablespoon corn oil
50 grams of rocket
1 tablespoon sesame sprinkle (Look here)
50 grams of cold butter
salt
freshly ground pepper

BBQ sauce:
5 dl of ketchup (preferably Heinz) - I used Beauvais as I don't care for Heinz and it came out really good!
300 grams of brown sugar 
1 clove of garlic, crushed
1 dl finely chopped onion

Preheat the oven to 185C (about 365F). Give the sweet potatoes a good wash and put them in an oven proof dish. Roll them around in the salt until they are covered in salt and bake them in the oven for about 45-60 minutes depending on the size of the potatoes until they are well done.

Boil the corn for a few minutes in a pot with salted water. Take them out of the pot and dry them off and put them on the grill for about 5-10 minutes till they are done.

Cover the chicken breast in the oil, salt and pepper and put them on the grill - cooking them on each side for about 8 minutes till they are done.

Stir together the BBQ sauce and give it a quick parboil for about 5 minutes and serve it along side the chicken. Serve it on a plate on a spred of rocket and with the cold butter for the potatoes and the corn.
Bon appetit....


Thursday, May 27, 2010

Wrap Around

This was our second dish in the cooking project and I'm tempted to call it food of the God's - well the author of the cookbook has done a mighty fine job combining one delicious ingredient after another... Yum-O! My husband was fond of this dish as well and suggested that the other dressing we usually put on our tortillas also could be good in this wrap - I think we might try that some day as well. 

We got home pretty late, I had forgotten that the chicken had to marinade for 3 hours but we didn't want to eat that late, so I just let it marinade for an hour or so and the result was really good! The soy sauce in the marinade helps to make the chicken tender and it also helps keeping it moist - I don't think it's even possible to dry out this chicken as it is cooked in the leftover marinade. Very delicious!

Well this time Carina was the quick one and posted the recipe before I had even eaten, so I'm just reposting what she has posted.

Wrap Around  

Wrap Around - spinach

For four people you'll need:

Marinade:
4 chicken breasts
1dl Soya sauce
1dl liquid honey

Curry dressing:
1dl yoghurt natural
1dl mayonnaise (I used Miracle Whip Balance 10%)
½ clove of garlic
2 teaspoons of curry powder
salt

Filling:
1 cucumber
2 apples
50g of baby spinach (I put lettuce in my husband's wraps as he isn't very fond of spinach)
6-8 tortillas

Sesame sprinkle:
100grams of black sesame seeds
100grams of white sesame seeds
salt

Put the chicken breasts in a plastic bag. Stir together soya sauce and honey, and pour it into the plastic bag. Leave it to marinade for at least 3 hours in the fridge (1 hour will do as well). Stir together yoghurt, mayonnaise and finely chopped garlic in a bowl. Season it with curry and salt, then put it in the fridge till you need it.

Preheat the oven to 185C ( about 365F). Put the marinaded chicken breasts into an oven-proof dish and cook them for about 15-20 minutes. Because I only marinaded the chicken for about an hour I turned up the oven to 200C (400F) and let the it cook for about 20 minutes.Take out the chicken breasts and cut it into slices.
Cut the cucumber into long sticks. Remove the core from the apples and cut them into small thin “boats”.

Warm the white sesame seeds on a hot frying pan and mix the black sesame seeds with salt flakes in a bowl. Then add the white sesame seeds.

Warm the tortillas in the oven for about 1 minute. Spread out the curry dressing thinly on the tortilla. Put chicken, apple, cucumber, spinach onto the tortilla and sprinkle some sesame seeds over and wrap it. Bon appetit...  

Take a look at my friends results with this dish HERE

Wednesday, May 26, 2010

Potato dish with ham and rosemary

And so our cookbook challenge begins with this fine dish:

Potato dish with ham and rosemary


Well I just picked it, cause it looked easy to make after a long day at work and it was. It took about an hour all together and I don't think that's very long considering that the cooking time is 30 minutes. Personally I loved the way the rosemary, garlic and spinach tasted all mixed together and I think you have to like this combo to like this dish. My husband wasn't very fond of it and I admit it has a very unusual taste, but my taste buds were having a party with every bite. It was mushy underneath all the cheese but that's the only low point.

Now to the recipe, for four people you'll need:

800 grams of potatoes
1 large onion
30 grams of melted butter
salt and pepper
200g fresh spinach (that's what I used and it worked out fine)
1½ teaspoon of finely chopped fresh rosemary
2 cloves of garlic
125-150 grams of your preferred cheese
8 slices of Italian or Spanish salted air-dried ham

Grate the potatoes or cut them into super thin slices and put them in a bowl of cold water right away. Drain them and lay the potatoes out on a piece of cloth and pat them dry. Butter a small baking dish. Finely chop the onion and spread it out evenly with the potatoes in the bottom of the baking dish. Drizzle over the remaining of the butter and hit it with some salt and pepper.

Lay the spinach on top of the potatoes and onions . Sprinkle it with finely chopped rosemary and garlic. If you have leftover celery it would tast good finely chopped in this dish too.

Sprinkle over the cheese and put the baking dish in a cold oven. Turn it on at 200C (400F) and leave it to bake for 30 minutes. Turn off the oven 15 minutes before it is done and let it cook until it's golden on top. Lay out the pieces of ham on top of the dish before serving. Bon appetit...


Take a look at my friends results with this dish HERE

Related posts

You might also like: